Online Storage Auction Management
Table Of Contents
Please read this tutorial to learn how to set up and manage your auctions.
This page explains everything you need to know to use the seller features on this site.
System Requirements
This site was created with modern technologies and requires a modern web browser. This means a recent version of Google Chrome, Firefox, Safari, or Internet Explorer 9+. We don't support Internet Explorer 8 or older, so if you are on an older machine with Windows XP, please use a current version of Chrome or Firefox. If you are on a modern browser and experience issues, please let us know.
Getting Help
 We're here to help you with setting up your
company, facilities, and auctions. Whenever you are logged into the site, you will see a
help icon in the lower right-hand corner of your screen. This is your direct connection to our technical support. Feel free to use it whenever
you have a question or experience a problem on the site. It's just like a chat window.
We're here to help you with setting up your
company, facilities, and auctions. Whenever you are logged into the site, you will see a
help icon in the lower right-hand corner of your screen. This is your direct connection to our technical support. Feel free to use it whenever
you have a question or experience a problem on the site. It's just like a chat window.
Your Account
From the information you provided during signup, we've done some basic setup for your account, but please visit My Account and review the information under Account Settings.
Company Setup
Your account can have multiple companies, and one or more facilities within each company. Most of you will have just one company, but if you run multiple, independent storage businesses you can set them all up within this account. When you visit the Company List, you'll see a screen like this:

Look carefully at the orange Edit button. Notice it's split in half with a divider line? This is called a Split Button, and it's going to make life a little easier. The left hand side is a button, and you'll see as you work on the site it will usually be an action that makes sense, depending on what you're doing. The right hand side is a dropdown menu, so you can take other, less common actions.
You'll really love this split button when we get to looking at Auction Management.
Please visit the Company List, click Edit, and upload your company logo. The logo file should be a .jpg or .png file. If you need any help getting the proper image or uploading it, we can take care of it for you - just send us a message by clicking the help icon.
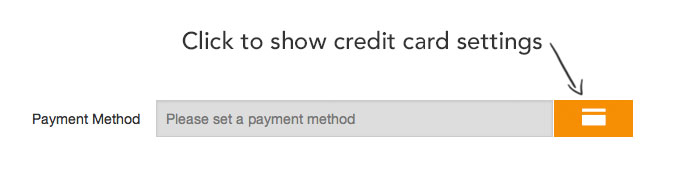
Another important setting in your company setup is the payment method. When an auction closes, you'll be charged the seller commission on the credit card saved in each company's setting screen.
Facility Setup
To set up your facilities, you start at the company you want to add a facility for. Click on Company List in the main menu, then pull down the orange button menu and choose Add Facility...

Most of the fields are self-explanatory. You'll definitely want to upload at least one facility image and mark it as the "Cover" picture.

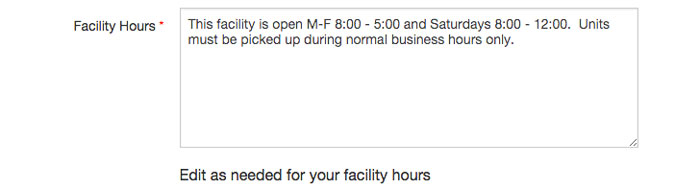
The Facility Hours are very important, this is where you let the buyers know when you are open and any notes about how or when they can pick up their unit after winning an auction.
The Policy Statement is your chance to specify how much time the winner has to pick up the unit, what the cleaning deposit it, and any other notes related to your company of facility policies with regards to your lien auctions.
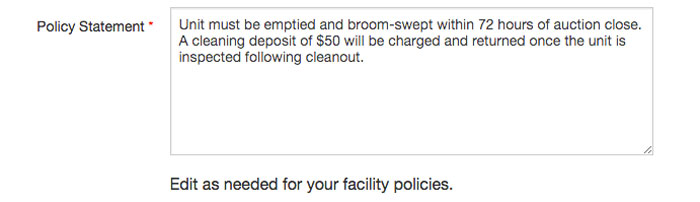
Pro Tip: Both your Facility Hours and Policy Statement are included in the buyer's bid confirmation emails and also sent to the winner. It's your chance to lay out, clearly, your policies and what you expect from the winning bidder.
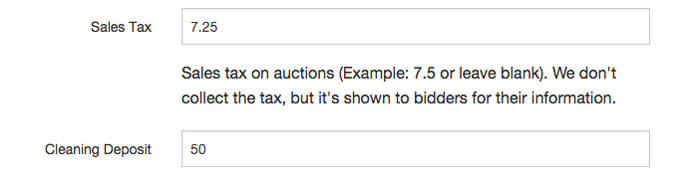
Also, make sure to fill out your Sales Tax and Cleaning Deposit amounts.
Auction Management
The Auction Management screen is the listing of all your auctions, and you can filter a view based on their status.
It's important to understand auction statuses and how to use them to manage your auctions. It's easy, we promise. Here is a quick overview of how auctions proceed through the workflow:
 Newly created auctions are in the draft status. Auctions that are
in the draft status can be deleted, edited, or if properly set up (start date is in the future, a picture is marked as the "cover",
and it has inventory tags) can be moved into the scheduled status.
Newly created auctions are in the draft status. Auctions that are
in the draft status can be deleted, edited, or if properly set up (start date is in the future, a picture is marked as the "cover",
and it has inventory tags) can be moved into the scheduled status. Once an auction is ready to go, you can schedule it. It will go live at the set time.
 While launching, we are sending out an email blast to bidders announcing it.
 The auction is open and can accept bids.
 The auction is in the soft-close process.
 The auction is over and has sold.
 The facility operator has cancelled the auction, most likely because the tenant cured the lien.
 The auction ended without any bids exceeding the minimum bid (which defaults to $20).
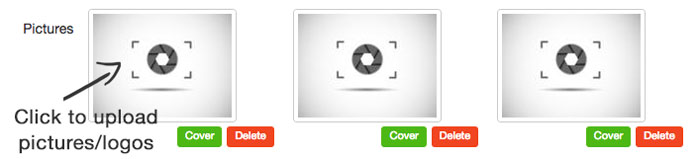
Uploading Pictures
Pictures are used in 3 places on the site.
- Each company can have up to 3 pictures, one of which is marked as the "cover" photo and is shown in the Facility Detail view of the site. Normally we recommend the company picture be your logo.
- Each Facility can also have up to 3 pictures, and the one marked as the "cover" picture is shown in the Auction Detail screen, along with the facility address
- Auctions can have up to 12 pictures each
To upload pictures (or a logo for your company), just click on the first empty picture spot:
Then in most cases you'll just upload a picture from your computer, so you'll click the Choose File... button.
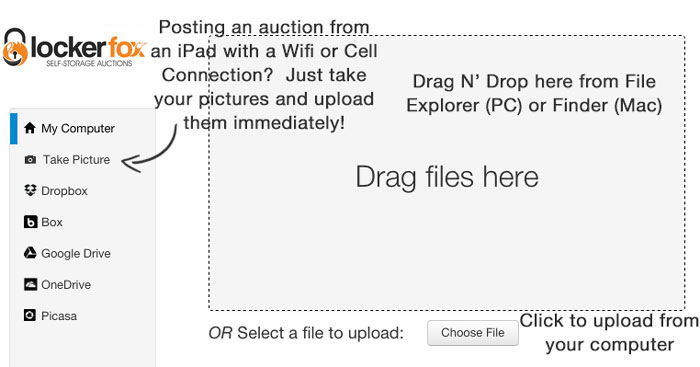
The uploader also connects to cloud services like Dropbox.
Pro Tip: If you use Dropbox and have the Dropbox app on your phone, you can take auction pictures on the phone, launch the Dropbox app, and it will sync the pictures up to Dropbox. Then, back in the office, upload the pictures to the auction from this uploader. You can also use this trick on an iPad or other tablet that has Wifi access. Drop us an email if you need help getting set up with this super-cool workflow!
You can select and upload and entire set of images at once, so you could select an entire set of auction pictures and upload them in one shot:
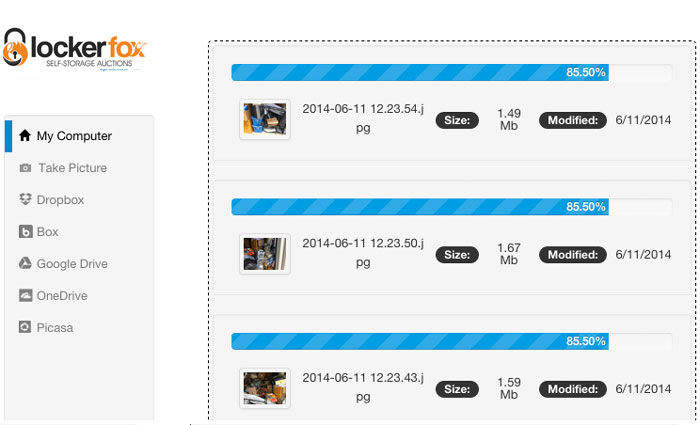
Pro Tip: This feature is a huge time saver.
Finally, you'll want to set the "Cover" picture. For a Company, this should be a logo. For a facility, it should be a nice exterior facility shot. For an Auction, this will be the top image in the Auction Detail Screen.

User Management
Our system supports very flexible user management features. There are 2 types of user and organization management available for your use.
Initially, your account will use Express Management, which makes sense for an organization with a small number of facilities. Express Management is simple to use and offers enough flexibility to manage the system from a Company viewpoint and a Facility viewpoint. Express Management is perfect for a self-storage operator with a few locations located in the same state.
If you are a large organization with many locations broken into regions, you can benefit from additional features by creating regions and managing region or division level users and grouping factilities into regions. This configuration is called Enterprise Management.
Express Management
In the default configuration using Express Management, the initial account that signed up is a Super User, and can create companies, facilities, users, and post auctions. The Super User account has full control and can do anything, even create other Super User accounts.
Normally, when using Express Management, the Super User account will create the facilities. Please remember, if you have many facilities we can import them all at once for you - just ask. Once the facilities are created go ahead and create an account for each facility manager. Facility accounts are created by pulling down the facility button menu:

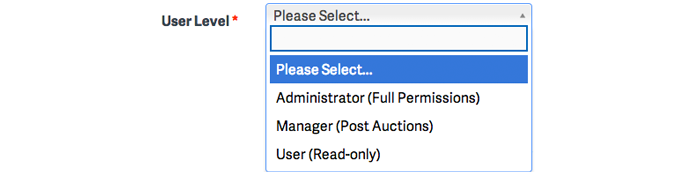
Then, in the user creation screen, you'll need to select the proper permissions level. Most likely, you'll be creating accounts with a user level of Manager, which can edit facility information, post auctions, and create read-only user accounts.
Once you've create user accounts, you can easily manage them from your My Account dashboard screen

Enterprise Management
If you have a large organization, with many locations, we have advanced features available for you. Give us a call and ask for details.
